Quiet Electronics Moderated Newsgroup For The Electronic Professionals and Other Professionals > Delaware
> Wholesale
> Manual vacuum de-soldering tool (solder sucker)
Manual vacuum de-soldering tool (solder sucker)
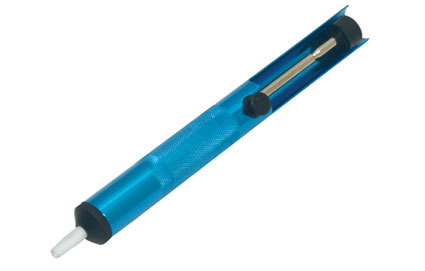
Manual Vacuum De-Soldering Tool (Solder Sucker)
OK, for you folks out there that are still working with old 20th century technology like through hole components, hot rocks, stone knives & flint axes, we present the gnawed bone of the soldering world, the solder sucker. Might as well hammer on a circuit board with them, but some swear by them anyway and who are we to pass up a buck?
This is a manually operated vacuum desoldering tool, normally referred to as a "solder sucker". This one is constructed of aluminum and plastic and is ESD safe so you won't add shocking insult to injury of a circuit board. The shrouded plunger guard makes it eye safe unlike some other primitive models.
We have one rule about desoldering surface mount components with a vacuum tool or "solder sucker".........Don't. Leave them for the through-hole parts if you must have and use one. (Actually we find solder wick works better there as well.) I see way too many neophytes struggling to remove a two leaded passive part (much less a multi-legged IC) from a board by trying to free all pins and take the part out intact. .
Unless its the dead last $100 part you have, make life easy on yourself and clip the leads to the component and remove the leads with pliers or tweezers one at a time. Clamp in a vise and heat the joint from the solder side while pulling the leads out from the component side. This only leaves clearing the solder from empty holes to the solder sucker. It can manage that.
If you are removing a part, it is likely bad or damaged and clipping the leads is no big deal and it isn't likely to get mixed in with good components later. If you are just trying to salvage a part, what is the cost of a new part compared to the time you are going to waste pulling it off that board and most likely damaging the board in the process.
If you are going to use one, at least follow the rules.
1. Clean, re-tin and clean your soldering iron tip again (just like you are supposed to everytime you use it) for maximum heat transfer.
2. Preheat the offending solder joint until liquid before bringing the solder sucker tip to the joint. (We have many replacement tips for sale to those who don't heed this rule and heat the joint and solder sucker tip at the same time,. so maybe I should skip this rule.....) Remember that pads tied to surface or inner ground planes will take significantly longer to come to temperature due to the heat sinking properties of the planes.
3. Inspect the joint to make sure the solder is removed completely from the plated through hole. If not, you may need re re-solder the joint with fresh solder and try again. Don't continue to re-heat the pad over and over again to try and get that last little bit out. Its not gonna happen and you will loosen or lift the pad. An alternative is to use a thin, sharp stainless pin that solder won't stick to (Much like our dental pick assortment) to gently push through the hole while heating it to clear any remaining plugs or bridges.
* Items are guaranteed against DOA only and only for exchange of same or like items.
* No refunds will be given, only exchange for same or equivalent item.
* Exchange items require an RMA number requested by email with a description of the defect.
* All claims for DOA items for exchange must be made within 14 days of receipt of item.
* All items are new unless otherwise specified.